Manual
About
ZL Compressor is a dynamic range processor with the following key features:
- Intuitive GUI feedback: Real-time Peak & RMS display; Hardware-accelerated rendering.
- Optimized CPU usage: Efficient lookahead & up to 8x over-sampling.
- Versatile Processor Settings: Four processor styles & Extensive processor parameters; Post processing clipper.
- Advanced Side-chain Control: 8-band parametric equalizer; Stereo mode & link control.
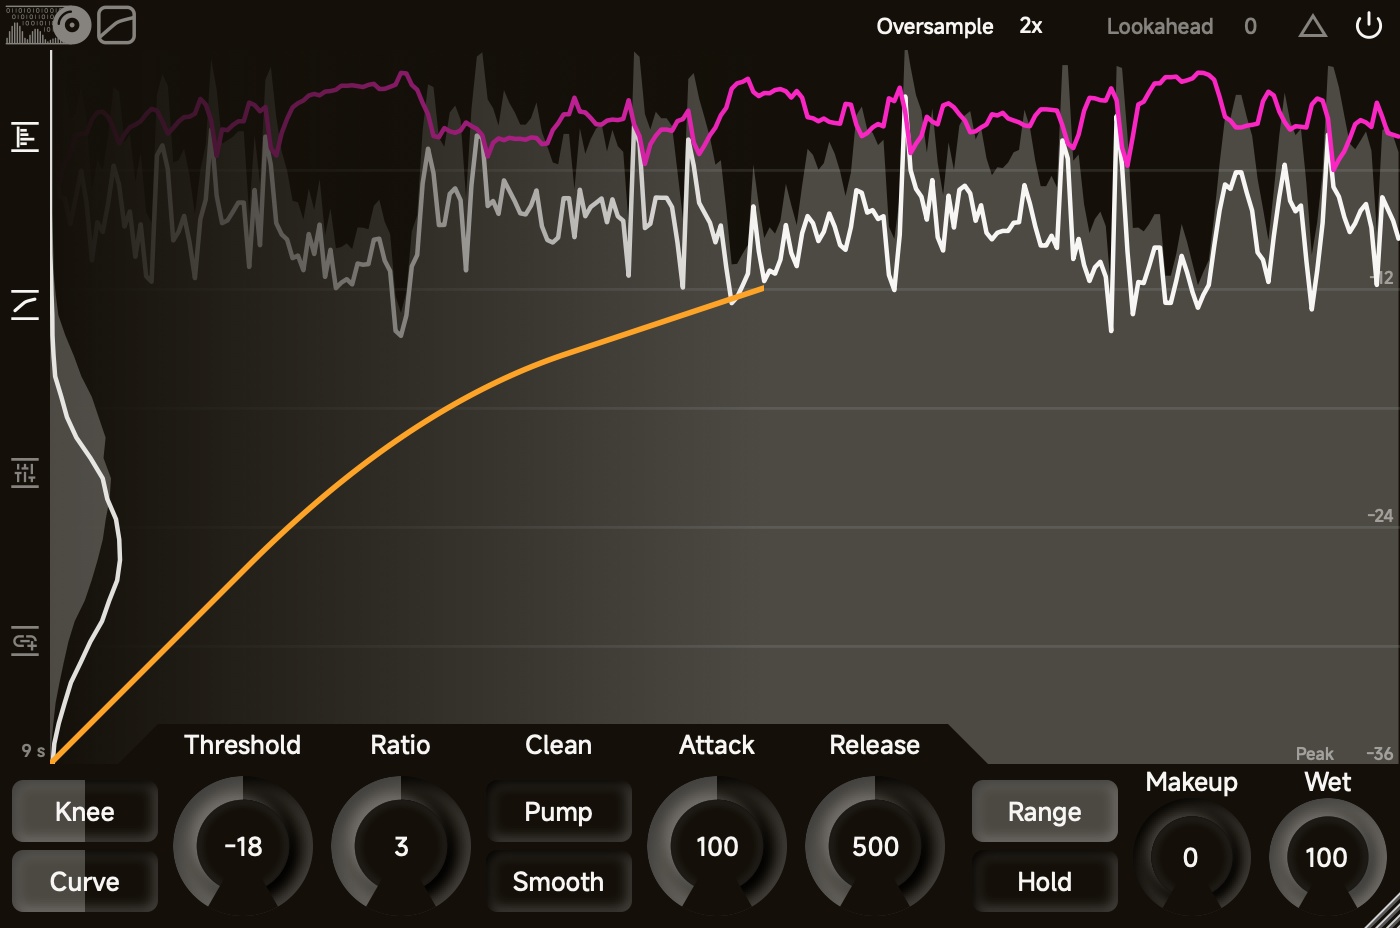
Top Panel

![]()
You can open the UI setting panel by double-clicking the logo.
Processing Direction
Compress: downward compressionInflate: upward compressionExpand: downward expansionShape: upward expansion
When you change it to Inflate or Shape, Clipper will be set to 100% to soft-clip the output at 0 dB. You can adjust the clipping value afterward, but be sure to monitor the output levels to prevent damage to your monitoring equipment or your hearing.
Clipper
Controls the relative drive of the clipper.
Oversample
There are four over-sampling options:
OFF: No over-sampling. No extra latency.2x: 2 times over-sampling. 64 sample latency (~ 1.3 ms under 48kHz)4x: 4 times over-sampling. 72 sample latency (~ 1.5 ms under 48kHz)8x: 8 times over-sampling. 76 sample latency (~ 1.6 ms under 48kHz)
You may hear clicks/pops when you change this parameter. Please DO NOT automate this parameter.
Lookahead
Controls the delay of the main-chain signal (in millisecond). If PDC is supported (in almost all DAWs), it can be interpreted as the lookahead time of the side-chain signal.
You may hear clicks/pops when you change this parameter. Please DO NOT automate this parameter.

- Press: output delta signal (the difference between the uncompressed main signal and the compressed main signal)

- Release: bypass plugin
WARNING: if you enable the delta signal and bypass the plugin, the plugin will output silence.
Left Side Panel

- Press: open the cumulative analyzer
- Release: close the cumulative analyzer

- Press: open the computer display
- Release: close the computer display

- Press: open the side-chain equalizer
- Release: close the side-chain equalizer

- Press: open the side-chain panel
- Release: close the side-chain panel
Center Panel
The center panel consists of a magnitude analyzer, a cumulative RMS analyzer and a computer display.
Magnitude Analyzer
The magnitude analyzer occupies the whole center panel. It shows three curves:
- the pre curve: magnitude of the input main-chain signal
- the post curve: magnitude of the output main-chain signal
- the reduction curve: magnitude of the gain reduction
In the bottom-left corner, you can select the analyzer’s time window length (6 s, 9 s, 12 s, and 18 s). To ensure visual fluidity, the 6 s and 9 s settings perform best with a refresh rate of 60 Hz or higher.
In the bottom-right corner, you can select the magnitude type (Peak and RMS) and the minimum decibel value of the analyzer (-9, -18, -36, -54, and -72).
When you put the mouse above the magnitude analyzer, you can adjust the threshold via mouse wheel and adjust the ratio via Ctrl/Command + mouse wheel.
Cumulative Analyzer
The cumulative analyzer on the left shows the cumulative RMS values of the input main-chain signal and the output main-chain signal. You can double-click to reset this analyzer.
Computer Display
The computer display shows the curve that is used to calculate the gain reduction value.
Bottom Panel
Knee
Controls the knee width of the gain reduction computer. A wider knee makes the transition between the uncompressed state and the compressed state smoother.
Curve
Controls the non-linearity behavior of compressed state. Available for Compress and Shape.
Floor
Controls the floor value where it becomes uncompressed state again. Available for Inflate and Expand.
Threshold
Ratio
Compression Style
Clean: feedforward design with exponentially decayed attack/release stages, which offers transparent, precise dynamic control.Classic: feedback design with exponentially decayed attack/release stages, which offers smooth, glued dynamic controlOptical: feedforward design with linear decayed attack/release, which offers smooth, precise dynamic controlVocal: feedback design with linear decayed attack/release, which offers gentle, buttery dynamic control
Optical and Vocal are not available for Inflater and Expand directions.
Pump
Controls the behavior of the attack stage. Larger Pump makes the attack more aggressive, which introduces the pumping effect.
Smooth
Controls the behavior of the release stage. Larger Smooth makes the start of the release stage slower.
Attack
Release

- Press: enable RMS compression
- Release: disable RMS compression
RMS compression reacts to a short-term loudness and lets peaks go through, which helps to achieve a more transparent and natural-sounding compression.
![]()
Range
Controls the gain reduction range. The actual value is affected by the Wet.
Hold
Controls the minimum amount of time where gain reduction is prevented from decreasing. During this time, compression can react to new peaks but cannot release.
Makeup
Controls the makeup gain that is applied after the compression. The actual value is affected by the Wet.

- Press: when you press it, it starts to measure the integrated loudness of the input signal and the output signal
- Release: when you release it, it updates the Makeup to the difference between two loudness values
- during the learning process, you cannot modify Makeup and Wet
Wet
Controls the percent of wet signal.
Side-chain Panel

Set the stereo mode to Mid/Side. Mid/Side is linked with each other.
For example, if the reduction of Mid is -5 dB, the reduction of Side is -1 dB, and the link is 20%, the final results are:
- Mid reduction: (-5) * 0.8 + (-1) * 0.2 = -4.2 dB
- Side reduction: (-1) * 0.8 + (-5) * 0.2 = -1.8 dB

Set the stereo mode to Left/Right. Left/Right is linked with each other.

Set the stereo mode to Mid/Side Max. Mid/Side is linked with the maximum of Mid/Side. As a result, the larger reduction won’t decrease.
For example, if the reduction of Mid is -5 dB, the reduction of Side is -1 dB, and the link is 20%, the final results are:
- Mid reduction: -5 dB
- Side reduction: (-1) * 0.8 + (-5) * 0.2 = -1.8 dB

Set the stereo mode to Left/Right Max. Left/Right is linked with the maximum of Left/Right.

- Press: swap the side-chain stereo mode
- if the stereo mode is Left/Right, the side-chain is from Right/Left
- if the stereo mode is Mid/Side, the side-chain is from Side/Mid
Link
Controls the link between two stereo channels.
Stereo Wet
Controls the percent of wet signal for each stereo channel. The actual value is affected by the Wet.
Gain
Controls the gain of the side-chain signal.

- Press: use external side-chain signal
- Release: use internal side-chain signal

- Press: listen to the side-chain signal
Side-chain Equalizer
The side-chain equalizer allows you to visually equalize the side-chain signal. It features a spectrum graph where you can add and manipulate filter bands.
Add a Band
If there is at least one frequency band in the off state when you double-click the spectrum, a frequency band will be turned on with the corresponding frequency/gain:
- Frequency < 20Hz: Adds a High Pass filter.
- 20Hz <= Frequency < 50Hz: Adds a Low Shelf filter.
- 50Hz <= Frequency < 5000Hz: Adds a Peak filter.
- 5000Hz <= Frequency < 15000Hz: Adds a High Shelf filter.
- 15000Hz <= Frequency: Adds a Low Pass filter.
Drag a Band
When a frequency band is not in the off state, a draggable button appears at the corresponding frequency/gain position. You can adjust the frequency and gain by dragging the button, adjust the Q value with mouse wheel, and adjust the slope with Ctrl/Command + mouse wheel.
When you select the frequency band via clicking the button:
- an additional control window will appear near the button, through which you can quickly bypass/close the selected band, choose the filter type, and adjust the filter slope.
- the frequency/gain values will appear at the top-left corner, through which you can view/edit the frequency/gain values of the selected band
Solo a Band
You can solo a band by double-clicking on the draggable button and exit the solo by clicking the spectrum. Solo will also be turned off if you close the equalizer window or close the plugin window.
Right Click Menu
When you right-click on a frequency band, the right-click menu will appear, through which you can invert the gain of the current band, or copy/paste filters (even across plugins).
RMS Panel
RMS Length
Controls the RMS window length (in millisecond).
RMS Speed
Controls the relative attack/release speed of RMS compression.
RMS Mix
Controls the mix percent of RMS compression.
UI Setting Panel
The UI setting panel controls analyzer colours, slider operations, etc. Components will be introduced in the order from top to bottom.
Colour
You can adjust the colour by clicking on the left colour block and change the transparency by dragging the right slider.
Text Colour
Background Colour
For better accessibility, please set Text/Background to colours with high contrast.
Shadow Colour
Glow Colour
Pre Colour
Post Colour
Reduction Colour
Computer Colour
Grid Colour
Colour Map 1
- The colour map of the curves of each single filter.
Colour Map 2
- The colour map of the curves of Stereo/Left/Right/Mid/Side.
Import Colours
- import colour settings (
.xmlfile)
Export Colours
- export colour settings (
.xmlfile)
Control
Wheel Sensitivity
- Rough: mouse-wheel sensitivity when Shift is not pressed
- Fine: mouse-wheel sensitivity when Shift is pressed
- Reverse: whether to reverse the direction of mouse-wheel when Shift is pressed
Drag Sensitivity
- Rough: mouse-drag sensitivity when Shift is not pressed
- Fine: mouse-drag sensitivity when Shift is pressed
Rotary Slider Style
Circular: A rotary control that you move by dragging the mouse in a circular motion, like a knobHorizontal: A rotary control that you move by dragging the mouse left-to-rightVertical: A rotary control that you move by dragging the mouse up-and-downHoriz + Vert: A rotary control that you move by dragging the mouse up-and-down or left-to-right- Distance: the relative distance that the mouse has to move to drag the slider across the full extent of its range. It does not apply to the Circular style.
Slider Double Click
Return Default: when you double-click the slider, it returns to the default value; when you double-click the slider with Ctrl/Command, it opens the value editor.Open Editor: when you double-click the slider, it opens the value editor; when you double-click the slider with Ctrl/Command, it returns to the default value.
Import Controls
- import control settings (
.xmlfile)
Export Controls
- export control settings (
.xmlfile)
Other
Refresh Rate
For better analyzer display, set this as 1/n of your monitor refresh rate. For example,
- If your monitor refresh rate is 120 Hz, set it to 120 Hz, 60 Hz (1/2), or 30 (1/4) Hz. DO NOT set it to 90 Hz.
- If your monitor refresh rate is 90 Hz, set it to 90 Hz or 30 Hz (1/3). DO NOT set it to 60 Hz.
FFT Setting
- Tilt: the extra tilting slope of the FFT
- Speed: the extra decay speed of the FFT
Curve Thickness
Controls thickness of the magnitude analyzer
Tooltip
Choose the tooltip language. It will take effect when the plugin window is re-opened.
UI Scaling
Choose the font size mode.
Scale: the font size scales with the window size. Control the relative ratio.Static: the font size is fixed. Control the actual font size.
Bottom Buttons

- Save the current setting.

- Load the default settings of some colours.

- Discard all unsaved settings and close the UI setting panel.
Shortcuts
Generally, you can enable fine-adjustment with Shift and enable special adjustment with Ctrl/Command. If the direction of the mouse wheel is reversed when Shift is pressed, you can reverse it again to put it back to normal.
- when using the mouse to drag / the mouse wheel to adjust sliders, you can enable fine-adjustment with Shift
- when dragging the band button, you can enable fine-dragging with Shift
- when dragging the band button, you can fix frequency with Ctrl/Command + left-click and fix gain with Ctrl/Command + right-click